
This series will follow the process of reverse engineering router firmware with the purpose of discovering any vulnerabilities that could be used either remotely or locally to compromise the router. In this section I will mainly be covering how to extract/download the firmware alongside a very basic way to get a root shell on the firmware in this tutorial.
Firstly the firmware being analysed in this tutorial can be found here (for v8 of the TP-Link WR841N). In some cases, the firmware for your device of choice can be found by using your preferred search engine due to a lot of manufacturers making the firmware freely available for download, however due to the growing interest in the exploitation of embedded devices, it is becoming common practice to only have the firmware accessible by accessing the device physically i.e.. using a serial port or by manually dumping the flash memory.
General Linux RE Tools
- file – To determine if it is a valid file/file type.
- hexdump – a hex dump naturally.
- strings – similar to hexdump however presented in a readable format if possible.
- dd – To scrape data out of the bin file
- lzma – to decompress any LZMA files
3rd Party Tools
- binwalk – to analyse the file for firmware headers and file systems.
- Firmware Mod Kit – Bundle of scripts to automate the extraction process.
- squashfs-tools – Can apt-get squashfs-tools for this. Bundle of tools to enable you to play with the squashfs in this tutorial
Initial Analysis
Generally the normal start to reverse engineering is to dump as much information on the file you can get using the standard Linux tools listed above. This should give enough information to determine where to go next for example in the hexdump you may find sqsh meaning that there is a squashfs on the file or perhaps spot U-Boot which is a well documented boot loader used frequently within firmware packages.
File Tool
The file tool essentially just tells us whether or not the file is a known file type and in some cases what kind of file it is e.g. data file.
You should see something similar to this:

Which will confirm whether it is a readable/known file type or whether further investigation is needed. In this case we can see that it is (naturally) a data file.
hexdump
The hexdump tool is invaluable as it allows you to inspect the dump for any key phrases or words that can tell you what kind of system you are reversing as previously mentioned. The hexdump for this file should look like this:

The command above will pipe the results of the hexdump into a file (hexTP.txt) for further analysis. The -C sets hexdump to format the dump in Canonical hex+ASCII display making it easier to read. In this case we don’t gain all that much from the hexdump other than the manufacturer being TP-Link (which we already know) so the next step would be to try running strings on the .bin file to see if it gives us a more informative result.
strings
Strings is probably the most used and one of the best tools to start with as it displays all the printable data within the file. This can allow you to analyse the header of the file etc. Like we did with the hexdump, it is worthwhile piping the result of strings into a file for your own convenience to save having to re run strings every time you want to check something.
We find a few interesting phrases within the strings results:
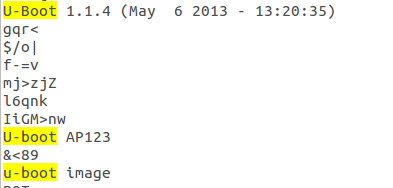
This was done just by opening the strings result file we found and searching for common boot loader names of file system names e.g. U-boot. This could also be done by grepping the file should you prefer. Now we know that the embedded device is using the U-boot boot loader and the version meaning that we can look up the documentation for it to gain a better understanding of the how the embedded device is designed.
Binwalk
Binwalk is a valuable tool to have considering it will scrape the bin file for any firmware headers or file systems that it may contain and then show you the offset of each of these sections should you wish to dd them. The binwalk output should produce:

Which gives us a wealth of information relating to the firmwares structure, from the boot loader it is using to the file system type. From these results we know that the firmware runs a Linux system on MIPS architecture, with a Squashfs file system that has been compressed using LZMA. It also confirms that the boot loader is indeed U-Boot as found in the strings results.
Extracting the Filesystem
Now comes the interesting section where we get to extract the contents of the file system held in the firmware image. With it being a Linux system it is safe to assume that the file system should contain the standard linux default folders where we could find some sensitive information e.g. the passwd or shadow file.
One of the ways that a lot of people will extract the FS is by using dd. However for the sake of time and ease, there are two main ways I would recommend for extraction.
The first is to use the -e parameter of binwalk which will automatically extract everything from the firmware image for you.
user@host$ binwalk -e <input file>
The second, and more efficient way of extracting is to use the extract-firmware.sh script that can be found in the Firmware Modification Kit. The reason for this is due to the fact that should you wish to modify the firmware and repack it, you can use the other script build-firmware.sh to do so. It saves a lot of time than manually extracting and handles all the offsets etc for you. The extract script will create a new set of folders within the fmk directory whereby you can find all the contents of the file system, the path should be /fmk/rootfs.
Coming Soon
In the next part I will show you how to emulate the router architecture so you can try and run files that you extracted from the file system as well as how to get a root shell on the router!